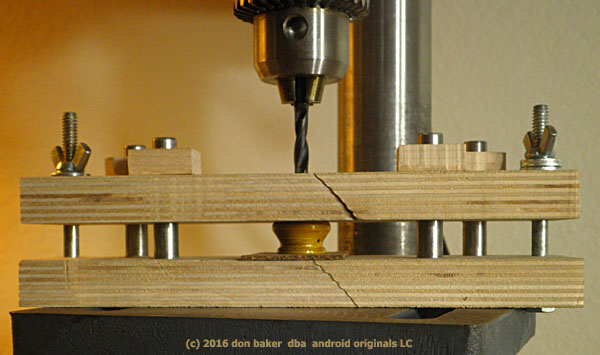
Before a better method was developed, as many as 240 guitar knobs were made with a ¼-20 threaded hole where the shaft hole would be. The inside diameter of that hole is less than either 6mm or ¼ inch, and has to be drilled out. Without a drilling jig, it’s very hard to make the hole square with the knob bottom.
The jig above works most of the time, but not always. It’s possible that the slop in the drill spindle of the Harbor Freight Item 38119 8” drill press (shown above) could be a problem. The jig consists of two pieces of ~17 mm birch plywood (from Woodcraft), about 2.375 by 8 inches. Two ¼ inch holes were drilled for bolts and wing nuts about 3/8 inch from the ends, so the bolts would sit off the drilling platform.
Four 3/8 inch holes were drilled through the two pieces clamped together with a Forstner bit. Four rods of 3/8 inch drill rod, about 2.5 inches long, were glued (CA instant adhesive) into the holes in the bottom piece. Then, for some reason, they did not line up with the holes in the top piece. It could be that a straight bit should have been used instead of the Forstner bit, and that the rods should have been sitting in the holes in the top piece when being glued into the bottom, to assure alignment.
To correct this, the top holes were overdrilled by about 1/32 inch. Four pieces of 3/8 inch thick maple with 3/8 Forstner bit holes were slid over the rods and glued (CA instant adhesive) to the top of the top piece. This was done with both the holes and the rods coated with neutral shoe polish to avoid gluing the wrong pieces together. Without the close-fitting maple guides, the top piece would have had too much slop to assure that the jig remained square.
A piece of 1/16 inch cork gasket material was glued to the bottom piece to protect the tops of the knobs. The knob is placed upside down in the jig, with the ¼-20 hole centered in a 3/8 inch hole in the top piece. The top piece is pressed down on it and the wing nuts are tightened. Washers are used because the threads in the ¼ inch bolts were too short, and the nuts wouldn’t tighten all the way down. If the nuts aren’t tightened enough, the knob can spin in the jig and the cork can wear the finish off the top.
After drilling, the knob is placed on a 6mm rod in a lathe or drill press and checked for wobble while spinning. Even if it spins square and flat, it may spin off-center. If the wobble is more than 1/32 inch, the hole should be coated with either CA adhesive or epoxy and re-drilled after it cures. Some knobs require this more than once. Care with the jig must be taken to assure that the shaft hole clears the 3/8 hole in the top piece, or it will be drilled off-center, and cause a major repair problem.
The best cure for this is to use a better method to make the knob in the first place. The better method is being documented and should be the subject of an upcoming book on making knobs. It virtually assures that there will be no wobble, and that the knob will fit a 6 mm shaft.

